How To Use This Guide
We’ve packed this guide with useful information - but don’t worry, you don’t need to read every word. We recommend you start by skimming these initial sections:
After that, use the Contents links to jump straight to the Brand-Specific Tips for your printer. If needed, check out the Troubleshooting and Maintenance Tips sections for extra help.
Introduction
If you’re not quite sure how to replace an ink cartridge in your inkjet printer, you’re definitely not alone. For most people, it’s something that only needs doing every now and then, so it’s easy to forget the exact steps.
The good news is that replacing ink cartridges is usually a quick and simple task - and we’re here to guide you through it. Whether it’s your first time changing cartridges or you just need a refresher, this step-by-step guide will help make the process easy and hassle-free.
We’ll start with general instructions that apply to most inkjet printers with replaceable cartridges, followed by specific tips for Brother, HP, Canon and Epson.
If you have a tank printer (like Epson EcoTank, Canon MegaTank or HP Smart Tank), you’ll find information for these too. They’re even easier to top up!
We hope you find this guide useful and that you’ll be back to clear, sharp printing in no time!
Ink Cartridge Basics
Cartridge inkjet printers use liquid ink housed in removable cartridges which supply ink to the printer’s printhead. There are two common types of ink cartridge systems:
- Integrated printhead cartridges
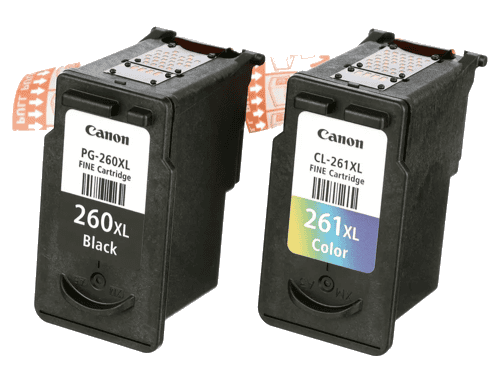
Entry-level Canon and HP printers use cartridges that combine the ink reservoir and printhead into a single unit. These are known as integrated printhead cartridges. Typically, this setup includes one black cartridge and one tri-colour cartridge, although some less common models may use separate colour cartridges.
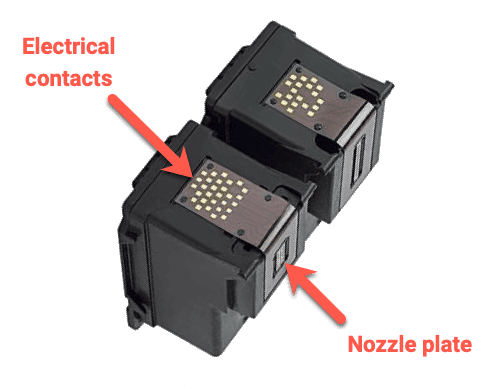
The printhead is a critical part of the cartridge. It includes metal electrical contacts (usually copper or gold) that connect to the printer, and a nozzle plate with tiny openings that eject ink onto the page. Because the printhead is built into the cartridge, it’s replaced every time you install a new one. This helps maintain print quality by reducing the risk of clogs and ensuring reliable ink flow.
Just to make things confusing, Canon refers to their integrated cartridges as FINE cartridges (Full-photolithography Inkjet Nozzle Engineering). HP calls theirs Integrated Print Head (IPH) cartridges.
- Individual ink tank cartridges
Common in Epson, Brother, and higher-end HP & Canon printers. The printhead is a fixed part of the printer itself, and each ink colour (cyan, magenta, yellow, black, etc.) is a separate tank that plugs into the printhead or an ink delivery system. These cartridges usually have nozzles in the printer, not on the cartridge itself. They often have chips to report ink levels.


Despite these differences, the replacement procedure is similar: you’ll open an access door to get to the cartridges, remove the empty cartridge, and install a new one. The key things to remember are to ensure the printer is in the right state (usually powered on so the cartridges are accessible); to handle cartridges carefully (ink can be messy and the cartridges or printheads are delicate); and to run any required alignment or cleaning after installation.
Power On or Off?
For almost all inkjet printers, you must power the printer on to replace cartridges. The reason is that the ink cartridge carriage (the assembly that holds the cartridges) is normally parked in a locked position when off. When the printer is on, opening the cartridge access cover will usually trigger the carriage to move to a centre position for easy access. (You might hear the printer whir as it positions the cartridges.) If the printer is off, the carriage may not move at all, or you risk forcing it.
Exception: Some Brother inkjet models have a front-loading ink bay where the cartridges are accessible without moving a carriage; in those cases the printer can be on or off, but it’s best to have it on so the printer immediately recognises the new ink.
In summary, turn the printer on, and as a precaution, don’t unplug it while the cartridges are out, because some printers need to track the cartridge change to perform ink charging.
Before You Begin
It’s wise to have new ink cartridges on hand before removing the old ones. Inkjets can dry out - leaving the printhead empty (without a cartridge installed) for too long can cause the tiny nozzles to dry and clog. So avoid removing an old cartridge until you’re ready to swiftly put the new one in.
Also, prepare a piece of paper towel or cloth for any incidental ink drops, and consider wearing disposable gloves if you’re dealing with particularly messy cartridges (some wide format or tank cartridges can have residual ink on them).
Finally, identify the correct replacement cartridges for your printer. Check the model number on the old cartridge or in the printer manual. Using the exact cartridge model (or a compatible third-party equivalent) is important – the wrong cartridge may not fit or be recognised.
Replacing an Ink Cartridge: Step-by-Step
Step 1: Prepare the Printer
Turn on the inkjet printer and wait until it is idle (no longer moving or making sounds). Make sure there’s no print job running. If your printer has an LCD screen with menus, you can also navigate to the maintenance section and select “Replace Ink” or “Ink Cartridge Replacement” if available – this is optional, as most printers will move the cartridges for you when you open the cover.
Step 2: Open the Cartridge Access Cover
This is usually the top cover or front compartment of the printer. For all-in-one printers with a scan bed, you often lift the scanner unit to expose the ink cartridges underneath. In some front-load designs (like certain Brother models), there’s a small door on the front that you open to access the ink cartridges.

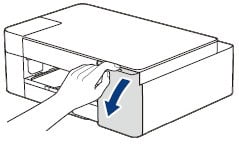
When you open the cover, observe the printer’s behaviour: the cartridge carriage should slide out from its parked position to the centre or somewhere accessible. It may take a few seconds, and some printers may briefly display a message like “Cartridge change” on the screen.
Important: If the carriage does not move on models without an LCD, you might need to press a specific button (often marked with an ink drop icon or labelled “Ink”) to prompt it. For example, older Epson printers require pressing the Stop or Ink button after opening the lid to present the cartridges.
Consult your printer’s manual if simply opening the lid doesn’t give access to cartridges.
Step 3: Release/Remove the Empty Cartridge
Each cartridge is typically held in place by a small clip or lever. The method to remove it varies by brand. Detailed guidance for each brand can be found in the Brand Specific Tips section that follows.
Regardless of brand, do this one cartridge at a time (if you have more than one to replace). Remove the empty cartridge and set it aside on a paper towel (ink may drip from the nozzle or port, so avoid placing it on a bare table).
Step 4: Unpack the New Ink Cartridge
Check the expiration date on the cartridge packaging, as old cartridges can sometimes cause issues even if new. If you have more than one cartridge use the oldest if they haven't expired.
Take your new cartridge out of its packaging.
Caution: Avoid touching the cartridge's gold/copper electrical contacts or the printhead nozzles (if it has one) – finger oils or static can impair connectivity or clog a nozzle.
Remove any protective packaging:
- Almost all new ink cartridges come with an orange plastic clip or tape covering the ink outlets.
- For cartridges with integrated printheads there’s usually an orange pull-tab that, when pulled, removes a tape covering the printhead and vent.
- For individual tank-style cartridges, there’s often a yellow tape that you peel off to open the air vent.
- Follow the instructions on the cartridge: typically a diagram shows which piece to remove. Do not remove any plastic pieces that are not meant to come off – e.g. don’t peel the label; clear plastic film that might cover the entire top of the cartridge but isn't a pull-tab; or pry open the cartridge casing.
- Be careful, as some ink might be around the nozzle; hold the cartridge by its sides. Do not squeeze the cartridge too hard, as some are soft-sided and can squirt ink if compressed.
- Tip: On some cartridges (especially Canon), once you remove the seal, you might see a small droplet of ink at the nozzle – this is normal due to pressure release. Just avoid getting it on you.
Step 5: Insert the New Cartridge
Install the new cartridge into the now-empty slot. Align it the same way the old one came out:
Orientation: Most cartridges have a keyed shape so they only go in one way. Specific details are explained below in the Brand-Specific Tips section.
Push until it clicks: Use firm but gentle pressure to push the cartridge into the holder. You might hear or feel a click when it’s secured. In Canon devices, pushing up the lock lever will lock the cartridge in place with a click. In HP, the cartridge’s own latch should snap over it.
If it doesn’t seem to fit, do not force it – double-check you have the correct slot (colour matching) and the correct cartridge model. Each colour slot often has a coloured icon or letter (e.g.“C” for Cyan) – verify you put the right cartridge in the right slot.
Do one at a time: If you have multiple cartridges to replace, insert them one by one, and ensure each is firmly seated in its slot. It’s easy to mix them up in models with many inks, so match the colour labelling.
Step 6: Close the Cover
Once all new cartridges are installed, close the printer’s cartridge access cover or scanner unit.
On many printers, closing the cover will prompt an automatic ink charging or initialisation. You might hear the printer whir and chug as it primes the new cartridge(s) – this is normal. Some printers will display messages like “Aligning printer” or “Charging ink – please wait.”
Do not turn off the printer during this process. Just let it finish (it may take a minute or two, especially if multiple cartridges were replaced).
Step 7: Confirm and Align (if prompted)
Many inkjet printers require or recommend an alignment after installing new cartridges, particularly if a cartridge with an integrated printhead was changed. The printer might either prompt you on-screen or automatically print an alignment page. Follow the instructions provided:
- For example, an HP printer might print a page with patterns and ask you to place it on the scanner for automatic alignment.
- If your printer didn’t automatically do an alignment, you can typically initiate one via the printer’s software on your computer or the printer’s menu (look for “Tools” -> “Align printhead” or similar).
- Alignment ensures the new cartridge’s print output lines up correctly for sharp text and images.
Step 8: Print a Test Page
It’s a good idea to print a test page or nozzle check to verify all colours are working. You can use the printer’s built-in test page feature or simply print a document that has text and colour graphics.
Check for any streaks or missing colours. Initially, you might see a few streaks or light printing as the ink flow stabilises, but it should clear up quickly.
If you see major issues, run a printhead cleaning cycle (available in the printer’s maintenance menu or driver software). It’s not uncommon after a cartridge change – especially on individual tank systems – to need a cleaning to clear any air bubbles introduced in the ink lines.
Brand-Specific Tips
Brother
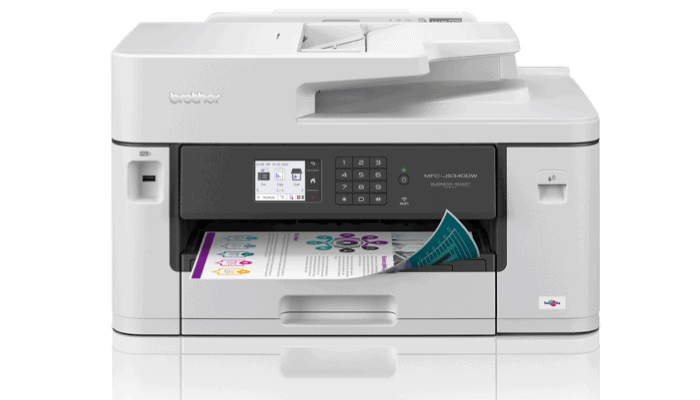
Most Brother inkjet printers (like the MFC-J series) use individual ink cartridges that are accessed through a front cover. The printer can often stay on or off, but it’s best to have it on.

Open the ink cartridge cover, which is usually on the front right side. You’ll see four cartridges aligned (for CMYK). Press the small lock release lever for the cartridge you want to replace and pull the cartridge straight out. Brother cartridges are typically rectangular tanks.

Unpack the new Brother cartridge and don't touch the area where the ink comes out or the small chip (1).

Slide the new cartridge in, following the arrow on its label, until it clicks into place. You may have to press where it says “PUSH” on the cartridge face to get it fully seated.
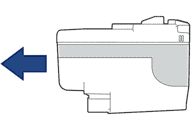
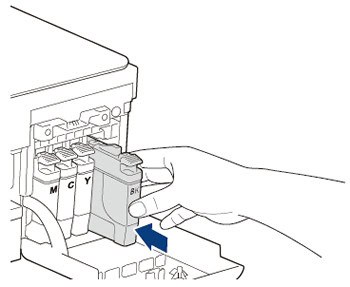
Close the cover and the machine will automatically reset the ink counter.
If the Brother printer doesn’t detect the new cartridge (e.g. “Cannot Detect Ink” message), ensure you pushed it in fully and that the cartridge’s green lever (if any) popped up. Also confirm you removed any protective tape from the new cartridge.
If you notice any print quality issues, use the “Cleaning” function via the printer’s menu to purge any air. Brothers will mix some colour inks even for black printing (for maintenance), so it’s normal for colours to run out even if you print mostly monochrome – replace them when needed to keep the printer happy.
Brother INKVestment Cartridges
These are for Brother's version of ink tank printers and we explain how to change these cartridges here.
HP
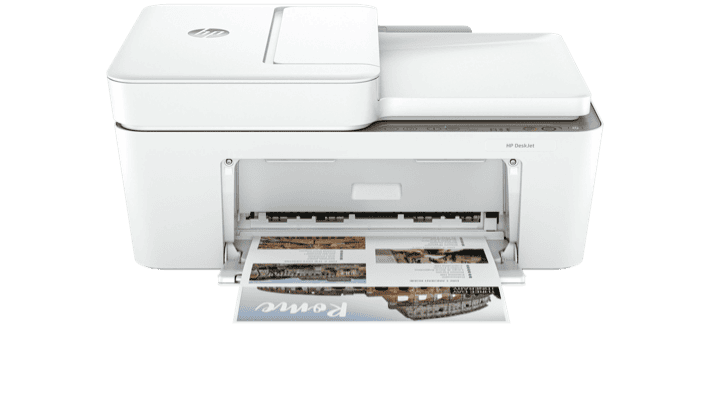
HP has two styles of Individual ink tank cartridges, as well as Integrated printhead cartridges. Replacement steps differ between these and are outlined below.

Type 1 - Individual ink tank Cartridges

The following HP cartridge series are Type 1: 178, 364, 564, 655, 862, 902, 903, 904, 905, 906, 907, 908, 909, 910, 912, 914, 915, 916, 917, 918, 919, 920, 934, and 935.
- Make sure paper is loaded into the input tray, and then turn on the printer.
- Open the door or lid to the cartridge access area. Wait until the carriage stops moving before continuing.
- Push in the tab on a cartridge, and then pull it from the slot.

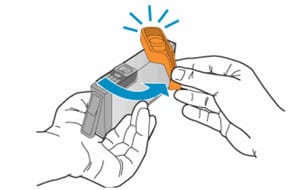
- Remove the new cartridge from the package, and then pull the orange pull-tab and plastic wrap completely off. The paper label on the top side tears slightly to vent the cartridge. Ensure you completely remove the-tab and plastic wrap before removing the orange cap in the next step. Otherwise, the ink might leak.

- Hold the cartridge by its sides, and then twist the orange cap counter-clockwise to remove it. CAUTION: Do not touch the copper-coloured contacts or the ink nozzles. Touching these parts can result in clogs, an ink system failure, and a failed electrical connection.
- Insert the cartridge into its colour-coded slot, and then press down on it until it clicks into place.
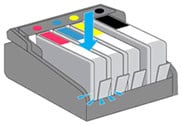
- If the cartridge does not firmly seat, take it out of the slot, gently bend the tab away from the cartridge no more than 1 cm, and then reinsert it. CAUTION: Bending the tab too far might damage the cartridge or cause the tab to break off.

- Close the door or lid to the cartridge access area, and then follow any instructions to align the printer if prompted.
Type 2 - Individual ink tank Cartridges

The following HP cartridge series are Type 2: 932, 933, 950, 951, 952, 953, 954, 955, 956, 957, 958, 959, 962, 963, 964, 965, 966, 967, 968, and 969.
- Make sure paper is loaded into the input tray, and then turn on the printer.
- Open the door or lid to the cartridge access area. Wait until the carriage stops moving before continuing.
- Push in on the front of a cartridge to release it from the carriage. CAUTION: Do not lift the latch handle on the side of the carriage. This can unseat the printhead and cause print mechanism damage and printing problems.

- Remove the new cartridge from the package.
- Insert the cartridge into its colour-coded slot until it clicks into place.
- Close the door or lid to the cartridge access area, and then follow any instructions to align the printer if prompted.
Type 3 - Integrated Printhead Cartridges
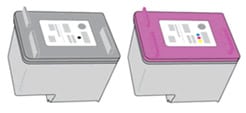
The following HP cartridge series are Type 3: 21, 22, 27, 28, 46, 56-68, 61/301, 63/302, 64/303, 65/304, 74, 75, 92-98, 110, 121-125, 129-131, 134, 135, 140, 141, 300-305, 308, 336-339, 342-344, 350, 351, 650-654, 662, 664, 667, 668, 675, 678, 680, 682, 683, 703, 704, 802-805, 818, 851, 852, 855, and 901.
- Make sure paper is loaded into the input tray, and then turn on the printer.
- Open the door or lid to the cartridge access area. Wait until the carriage stops moving before continuing.
- Remove a cartridge from the carriage which may or may not have carriage latches.
- For carriages with cartridge latches: Open the latch, and then pull the cartridge up and out of the slot.

- For carriages without cartridge latches: Gently press down on the cartridge to release it, and then pull it out of the slot.
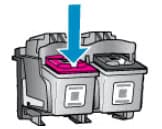
- Remove the new cartridge from the package. Be careful to hold it by the black plastic sides.
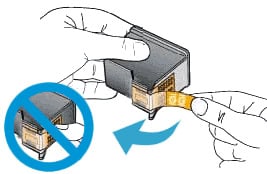
- Remove the tape from the cartridge. CAUTION: Do not attempt to replace the protective tape or touch the copper-coloured contacts or the ink nozzles. Touching these parts can result in an ink system failure.
- Hold the ink cartridge by its sides with the nozzles toward the printer, and then insert the ink cartridge into its slot. Make sure that the ink cartridge is inserted in the correct colour-coded slot.

- Push the ink cartridge forward into its slot until it snaps into place. Ensure it is securely seated in the carriage.
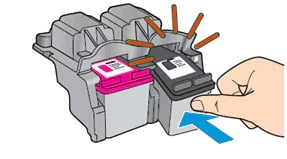
- Close the door or lid to the cartridge access area, and then follow any instructions to align the printer if prompted.
If you see a warning about “Counterfeit or Used Cartridges,” you can press OK to bypass.
HP’s printer software may also ask if you want to “Enable HP Cartridge Protection”. Say NO if you use third-party inks or your printer won't recognise these cartridges and compel you to use genuine HP cartridges only.
Once installed, HP printers usually automatically align if needed (especially if you changed a tri-colour or printhead cartridge). If print quality is off, use the HP Utility/Software to run a cleaning or alignment manually.
Epson
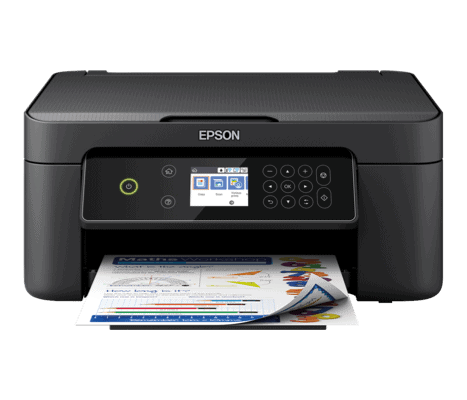
For Epson inkjet printers, it's generally recommended to select the "Ink Cartridge Replacement" option in the maintenance menu on the LCD screen before lifting the scanner bed to expose the cartridges.
- If your printer has already detected a low or expended cartridge, the LCD screen will prompt you to replace it. In this case, you can follow the on-screen instructions, which will guide you to select "Next" and then prompt you to lift the scanner unit when the print head is in the correct position for cartridge replacement.
- If you want to replace a cartridge before the printer issues a low ink warning, you should manually start the process via the printer's menu: go to the maintenance menu, select "Ink Cartridge Replacement", and follow the prompts. This ensures the print head moves to the replacement position, making the cartridges accessible and preventing damage to the printer.
- Do not lift the scanner bed before selecting the replacement option (unless the printer has already prompted you), because the print head may not be in the correct position, and moving it by hand can damage the printer.
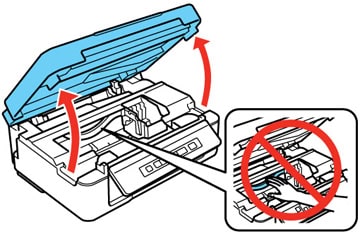
If the print head carriage hasn't moved into the replacement position, use the printer’s controls. Never force the carriage by hand. Either use the menu in the control panel to select “Ink Cartridge Replacement” or, on some models, you may have to press and hold the maintenance button to move the print head to the replacement position. This button looks like a droplet and a paper sheet, or an upside-down triangle in a red circle. Wait for the print head to stop moving before proceeding.

Some older Epson models have a plastic cover or latch over the cartridges. If your printer has one, gently flip it open to expose the cartridges fully.
Remove the old ink cartridge
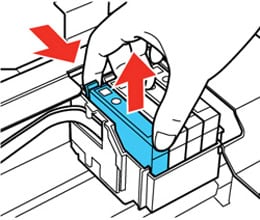
Identify the cartridge that needs replacing (the printer’s display or your computer might have indicated which colour is low). To remove a cartridge, squeeze the tab or clip at the end of the cartridge and lift it straight up out of its slot. It should pop out with mild pressure.
Prepare the new ink cartridge
Take your new Epson cartridge out of its packaging. If it’s a black cartridge or a larger cartridge, gently shake it 4-5 times before unwrapping to prime the ink. (For colour cartridges, a gentle shake isn’t required).
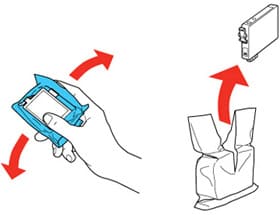
Remove the cartridge from the wrapper
There is usually a piece of protective tape (often yellow or orange) covering the ink outlet and vent hole – peel off this tape. Do not remove any other labels, seals, or plastic parts on the cartridge. In particular, do not peel off the transparent plastic film or any other coloured label, as these are not covers but part of the cartridge assembly; removing them will cause ink to leak. If your new cartridge has a plastic cap or clip (common on some high-capacity cartridges), remove that as well.

While handling the new cartridge, hold it by the sides. Take care not to touch the green/gold chip contacts on the cartridge. The chip is typically on the side or back of the cartridge and allows the printer to recognise the cartridge and its ink levels – it’s sensitive to fingerprints or static. Also avoid pressing on the ink nozzle. Now the cartridge is ready to install.

Insert the new cartridge into the printer
Align the new cartridge with the empty slot. Each slot will have a colour label or letter; confirm you have the correct cartridge for that slot (for example, don’t put a cyan cart in the magenta slot).
Hold the cartridge with the label facing up and the chip side facing toward the printer’s contact point (usually the chip faces the back of the slot or downwards, depending on design). Slide the cartridge into the slot in the same orientation as the one you removed. It should settle into place with the tab facing you.
Once in position, press down gently but firmly on the cartridge until it clicks into place. You might hear or feel a soft click when it’s seated correctly.
Do not force it. If it’s aligned correctly, it should click in with moderate pressure. If it doesn’t click, double-check that it’s the right way around (it won’t seat properly upside down or in the wrong slot).
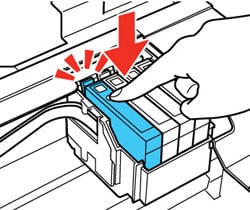
Epson cartridges are keyed to fit only in their proper slot, so never attempt to jam a cartridge if it’s not fitting – check orientation instead. Repeat this insertion for each cartridge you need to replace (one at a time). If your printer has an inner cartridge clamp/cover that you opened earlier, close that cover over the cartridges now, pressing it down until it clicks or latches.
Close the printer and allow it to charge the ink
Gently lower the scanner unit or printer top cover back down until it closes securely. Take care that it clicks into closed position; many Epson printers won’t run if the scanner lid is not fully closed.

Once closed, look at the printer’s display (if it has one) or the power light. In most cases, as soon as you close the lid, the printer will recognise that new cartridge(s) have been installed and will begin charging the ink. You might see a message like “Charging ink, please wait” on the screen. Do not turn off the printer during this process or you'll waste ink.
The power light may flash during ink charging – this is normal. It typically takes about 1–2 minutes for the printer to prime the new cartridge and get it ready for printing. Wait until the printer indicates that charging is complete (on some models the power light stops flashing and stays on once done, or a confirmation message appears on the screen).
If your printer prompts you (on screen) to confirm that you’ve installed a new cartridge or to press OK/Start to continue, go ahead and do so. Some models require you to press OK or a Start button after closing the lid, to begin the ink charging process. Follow any on-screen instructions accordingly.
Verify and test
After charging completes, verify that the printer recognises the new cartridge(s). The ink level indicators should show full or the new levels for the replaced colours. If the printer has an LCD, it may display a message that installation is successful or simply return to standby mode with no error messages.
In case you see an error like “Cartridge not recognised” or an ink light remains on, it could mean a cartridge isn’t seated properly. Simply reopen the printer cover, double-check each cartridge: press down on each one to ensure it’s clicked in firmly. Then close the lid again. If prompted, allow the printer to charge again or acknowledge the cartridge. In many cases, reseating the cartridge resolves the issue.
If the error persists, you can try gently cleaning the cartridge’s chip contacts (and the corresponding contacts inside the printer) with a lint-free cloth, as dirt or fingerprints can cause recognition problems. Then reinsert it.
Very rarely, a faulty cartridge (or incompatible chip) might be the culprit – in that case, you might need a replacement cartridge. But for genuine Epson carts installed correctly, you should get a “ready” status.
Once the printer is ready, it’s wise to print a test page or nozzle check. This ensures the new ink is flowing properly. You can use the printer’s built-in maintenance menu to print a nozzle check pattern or just print a simple document with text and color. Examine the printout – it should look normal, with no missing lines or colours.
If you do see gaps or misaligned lines, your printer may need to run a cleaning cycle or printhead alignment, which are maintenance functions available in the Epson software or the printer’s menu. It often takes one or two cleaning cycles to get perfect output after swapping inks, particularly if the printer sat empty for a bit.

Canon
Replacing FINE‑integrated print‑head cartridges
These cartridges are used in many Canon PIXMA models.
- Ensure the printer is powered on, retract the output tray and extension. Open the scanner top or cover; the cartridge holder will move to its replacement position - wait until it stops.
- Don’t touch the electrical contacts or nozzle on the cartridge - this may prevent proper printing.
- Remove the used cartridge: Push down gently on the cartridge until it clicks. Carefully lift it out by the edges to avoid ink stains.
- Prepare the new cartridge: Remove it from its packaging. Peel off the protective tape slowly; avoid touching the contacts or nozzles.
- Install the new cartridge: Insert diagonally into the correct slot: colour to the left, black to the right. Press in and push up firmly until it snaps into place.
- Close the cover securely. If error codes appear, follow on‑screen instructions.
- Alignment and cleaning: The printer will automatically clean the print head and then print an alignment sheet. Do not operate the printer until cleaning finishes. Then follow prompts to align the head for best print quality.
Key Reminders:
- Always replace immediately if you remove a FINE cartridge - don’t leave the printer with one missing.
- Once installed, avoid removing and exposing a cartridge for long periods (it may dry out within six months).
- Both black and colour FINE cartridges usually must be installed even if one is empty; leaving one out triggers errors.
Replacing non‑integrated ink cartridges
These are found in mid-range PIXMA models using separate non-integrated cartridges. Colour inkjet printers use both PGI and CLI cartridges, while monochrome‑only printers just use PGI cartridges.
PGI and CLI Cartridges: What's the Difference?
- PGI (Pigment Black Ink) cartridges are designed for printing text and provide sharp, fade-resistant prints.
- CLI (ChromaLife) cartridges use dye-based inks and are typically used for printing photos, offering finer detail and better colour reproduction.
Most four‑cartridge printers include a PGI (pigment black) cartridge for text and 3 CLI colour cartridges (Cyan, Magenta & Yellow), In some models (e.g. PGI‑270 / CLI‑271 series), there’s also a separate dye‑based CLI black alongside the pigmented PGI black to give better photo blacks.
- Turn the printer on. Open the cartridge access door; the carriage will move into place - wait until it stops.
- Identify the empty cartridge(s) shown by the printer display or software - e.g. PGI‑680 Black or CLI‑681 colour models common in NZ.
- Remove the old cartridge: Open the latch or tab for that slot (depending on model). Gently lift the cartridge out by its sides - avoid touching contact areas.
- Install cartridge: Insert the correct type into its slot - PGI goes into the pigment‑black slot, CLI into its designated colour slot. Push gently until it clicks and latch (if provided) closes securely.
- Close the access door. Printer may run an automatic cleaning or ink charge process immediately after installing new cartridges.
- Run nozzle check or alignment if needed via printer’s maintenance menu to ensure print quality—especially useful after installing pigment‑black cartridge.
Key Reminders:
- If any required cartridge (PGI or CLI) is missing or depleted, the printer will refuse to start.
- If you get a “no ink” or “ink not recognised” error on Canon, make sure the gold contacts on the cartridge are clean and the cartridge is fully clicked in.
- Press OK to bypass non-genuine warnings. Canon will stop displaying ink levels for third-party cartridges, but you can continue printing by confirming warnings when they pop up.
What About Tank Printers?
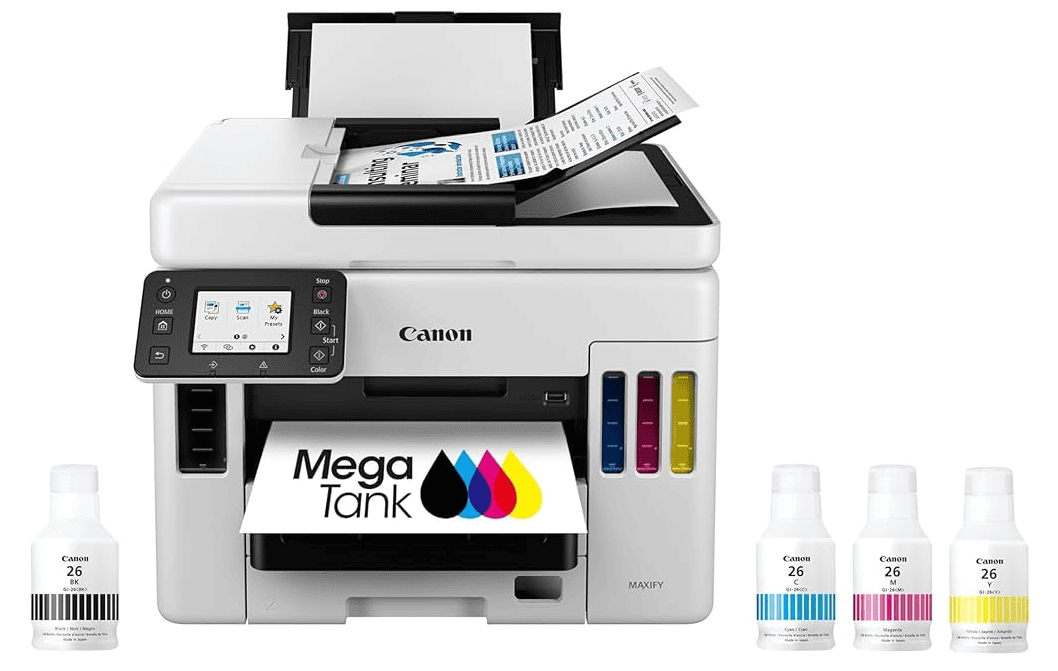
Ink tank printers (like Epson EcoTank, Canon MegaTank and HP Smart Tank) work a little differently - instead of replacing cartridges, you simply top up refillable tanks with bottled ink. These models are very popular in New Zealand, as they’re cheap to run and great for frequent printing. You can read more about tank printers here: The Benefits of an Ink Tank Printer.
If you have one of these printers:
- The process is very easy - just open the tank cover, unscrew or unclip the ink bottle cap, and gently squeeze the ink into the correct tank (match colours carefully).
- Most tanks have a clear window to show ink levels - only fill to the maximum line.
- Close everything up and your printer will usually detect the refill automatically - no reset needed.
- If the printer prompts for an “ink level reset” (mainly in older models), simply follow the on-screen instructions or press the appropriate button.
- Because you’re not replacing any printhead or cartridge, there’s usually no need to run an alignment or cleaning - just top up and print. For full details, check your printer’s user manual.

Brother INKvestment Printers
What about Brother INKvestment printers - are they the same as tank printers like Canon MegaTank?
Not exactly - but they're closely related.
Traditional tank printers - like Canon’s MegaTank or Epson’s EcoTank- use refillable ink bottles that you pour into integrated ink reservoirs, which feed the printhead via tubing. No cartridges required.
Brother INKvestment Tank printers such as the MFC-J4340dwxl and MFC-J4540dw are more hybrid: They include internal ink storage tanks, but you replenish them by snapping in high‑capacity ink cartridges (e.g. LC406, LC404) rather than pouring. This design eliminates bottle-pouring mess while offering high yield and low cost per page. Brother estimates up to a year’s ink in the box.
So while both designs use fixed ink tanks to feed printheads, Brother’s INKvestment simplifies refilling these by using cartridges instead of bottles.
How to replace INKvestment cartridges on a Brother printer
Here's a step-by-step guide:
- Turn on the printer. Watch for an ink warning or ‘replace ink’ prompt.
- Open the ink cartridge cover on the front-right side of the machine.
- Remove the protective green shipping lock inside (if present).
- Press the lock-release lever for the colour indicated and take out the cartridge.
- Unpack the new INKvestment cartridge. Avoid touching the contacts or nozzle area.
- Insert the new cartridge in the colour-coded slot. Turn the green knob until it clicks (some models), or push until it locks into place. Each colour slot is keyed.
- Close the ink cartridge cover. The printer will automatically reset its internal ink counter and prime the ink tubes into the tank and printhead, a process which may take several minutes. Do not power off during this priming.
- When complete, the printer is ready - no further alignment or maintenance steps are required.
Tips & Warnings
- Don’t shake cartridges or touch sensitive areas - the printer may fail to detect them or leakage may occur.
- Only replace cartridges when prompted - removing them prematurely may interfere with the internal ink level tracking.
- External cleaning cycles occur if the printer hasn’t been used for a while; these flush ink through the tubes and may deplete supply over time.
- Brother often includes a small green clip or lock inside the ink cartridge bay during transport. It's not actually part of the cartridge itself - rather, it's a shipping restraint designed to prevent accidental leakage or damage during delivery of a new printer. Once the printer is set up, this lock should be removed before installing ink cartridges. Taking it out ensures proper cartridge seating and avoids errors during installation. If left in place, the cartridge might not seat correctly and trigger errors (such as “Cannot Detect” or “Shipping Lock Error”). Store it safely, ideally in the original packaging or documentation. Later, if you need to transport the printer, you can reinsert the green lock to help prevent movement or ink leaks during transit.
Troubleshooting Ink Cartridge Issues
This is common with third-party or refilled cartridges, but can occasionally happen with genuine ones too.
First, verify you installed the correct cartridge model for your printer (printers will reject cartridges that aren’t the right model or regional code).
If it is correct, remove the cartridge and inspect the contacts/chip. There might be a small microchip on the cartridge; ensure it’s clean (gently wipe with a lint-free cloth). Also, check inside the printer where the cartridge sits – the contacts or spring pins inside could be dirty or have ink on them. Gently cleaning those with a cotton swab (printer off) can help. Reinsert the cartridge firmly.
Double-check the protective tape – on many new cartridges, if you don’t fully remove the sealing tape, the chip underneath might remain covered, leading to non-detection.
Another trick: if the printer has just been powered on, try doing a full restart after installing the new cartridge. Sometimes the printer’s internal memory needs to reset. For printers that track ink levels using a chip on the cartridge, the printer might mistakenly think your new cartridge is the old one - especially if the chip wasn't read properly. In many cases, simply turning the printer off, unplugging it from the wall for 30 seconds, and then plugging it back in and powering it on again (known as a “power cycle”) can help the printer reset and correctly detect the new cartridge.
If you're using a refilled genuine (OEM) cartridge - for example, a previously used Canon or Epson cartridge that has been refilled with ink - be aware that the original chip may still report the cartridge as empty, even though it has been refilled. This is because many OEM chips are programmed to track usage and don’t reset after a refill.
In such cases, the printer may display a “low ink” or “empty cartridge” warning and refuse to print unless you override the alert. On many Canon printers, for instance, you can press and hold the Stop/Cancel button for about 5 seconds to disable ink monitoring for that cartridge. After doing so, the printer will allow you to print, but it will no longer track ink levels for that specific cartridge.
Note: This only works on certain printer models, and you should check your printer’s manual or support page for exact instructions.
Sometimes a printer firmware update can cause issues with previously working compatible cartridges. Printer manufacturers make a lot of money from genuine cartridges. As a result, OEM printer manufacturers (especially Canon & HP) are making it increasingly difficult for customers to use compatible inks and toners by pushing automatic firmware updates which prevent printers from recognising non-genuine cartridges.
The good news is that, in the event of a firmware update, the manufacturers of the compatible cartridges we sell quickly respond by updating their cartridge chips. This ensures cartridge compatibility with the latest firmware, allowing you to use them without any issues.
IMPORTANT
To ensure future firmware updates don't impact compatible cartridges you've already purchased, we STRONGLY recommend changing your printer settings so that automatic firmware updates (which are on by default) are disabled.
Firmware update settings are usually found under the “settings” or “maintenance” menu of your printer. To find instructions specific for your printer, check your manual or do a quick Google search of your printer model + “turn off auto updates”. For most printers it’s a quick and easy process.
Lastly, if a particular third-party cartridge just won’t recognise no matter what, it could be a defective chip and need replacing.
If you notice ink smeared inside the printer or the cartridge seemed to leak upon removal/installation, don’t panic. Use gloves or a damp paper towel to carefully wipe away any pooled ink in the cartridge bay (avoid touching any circuitry).
For integrated cartridges (those with printheads), it’s normal to see a bit of wet ink on the printhead – that keeps it moist. But large splatters are not normal. It can happen if a cartridge was refilled incorrectly or stored upside down.
Clean any ink off the electrical contacts (both on cartridge and carriage) with a bit of rubbing alcohol on a swab if needed, let dry, then reinsert. Going forward, always keep cartridges upright and install them relatively soon after unsealing.
Warning: If you get ink on your skin, wash with soap and cold water (hot water can set the dye). If you get it on fabric, also use cold water immediately; many inkjet inks are water-soluble and will at least partially come out if addressed before drying.
It’s quite common to see some print quality issues right after a cartridge change, especially with individual ink tanks. If you see streaks, missing lines, or colours not printing:
- Run a nozzle check pattern (most printers have this in maintenance). This prints a grid or set of lines for each colour so you can see which are missing.
- If gaps are present, run a printhead cleaning cycle (also called “Head Cleaning” or “Clean printhead” in the menu). This will use a bit of ink to try to unclog any dried ink and push out air bubbles. You may need to do this 1-3 times for stubborn clogs. Always print a fresh nozzle check after cleaning to see improvement.
- Ensure you removed all air seals. Some cartridges have multiple pieces of tape; for instance, certain Canon tanks have both a tape and a cap. A partially covered vent will cause intermittent printing (the cartridge can’t breathe and ink won’t flow steadily).
- If a brand-new integrated cartridge (with printhead) is printing with streaks, it could have dried a bit in storage. You can try running the cleaning, and if that fails, gently blot the printhead on a wet paper towel (distilled water is best) to see if ink is coming through. But only do this as a last resort.
- Align the printhead if text is misaligned or if you see colour fringes; alignment fixes registration of the colours.
Remember, new cartridges (especially refilled or third-party) might take a few prints to “settle in.” If quality remains poor after these steps, the cartridge itself might be faulty (e.g., a damaged printhead on a cartridge, or bad ink). Try a different one if possible to isolate the issue.
If your printer immediately reports low or zero ink on a brand-new cartridge, it likely means the cartridge’s chip is telling the printer it’s depleted (which can happen with refilled cartridges that weren’t reset, or if the cartridge is counterfeit).
For third-party cartridges, sometimes the chips are not perfectly coded – you might get a “?” for ink level but it will still print. If it outright says empty and won’t print, you have to exchange that cartridge for a working one.
As a workaround, some printers allow printing in “ink out” condition for a bit if you disable ink monitoring (see Cartridge Not Recognised / “Cannot Detect” Errors trouble shooting tip above for details).
It’s not typical for a genuine new cartridge to show empty – if it does, ensure it was new and not inadvertently a used one.
Sometimes you might replace just one cartridge (say, the colour is empty but you only have a black, or vice versa).
Many printers will allow printing with one cartridge missing or empty, but with reduced functionality. For example, some Canon/HP will operate in single-cartridge mode (using only the black cart) if the colour is removed – this is usually automatic but might display a notice.
Others (especially Epson printers) will not print at all if any cartridge is empty (even for black-only jobs). In that case, you must have all cartridges functional or the printer stays halted.
Always check the manual, but generally to resume printing you either replace the empty cartridge or, if supported, set the printer driver to grayscale and possibly enable a setting like “Use black ink only” (some Epsons have a temporary override for empty colour inks by mixing remaining colours, etc.).
The best practice, however, is to keep all cartridges with some ink to avoid these interruptions and to keep the printhead from drying.
If you were replacing a cartridge because nothing was printing (e.g. totally blank pages), and a new cartridge didn’t fix it, the printhead might be severely clogged or not firing.
Run multiple cleaning cycles. If still blank, the issue might lie with the printer’s printhead (which could require manual cleaning or has failed electronically). In integrated cartridge models, replacing the cartridge usually resolves a clogged printhead since you get a new printhead with the cartridge.
If two new cartridges don’t output any ink, the printer could have a hardware fault in the carriage or firmware. At that point, consult manufacturer support.
Maintenance Tips
- Ensure your printer is printer in a stable environment, away from extreme temperatures or direct sunlight, which can affect ink and printhead longevity.
- To extend cartridge life and ensure quality prints, try to print something in colour at least once every week or two. Inkjets that sit idle for months are prone to dried nozzles. Also, use genuine or high-quality compatible inks; cheap ink can cause more clogs.
- If you aren't going to use your printer for an extended period, don't simply unplug it. Before unplugging it's important to first use the printer's "power off" button, as this allows the printer to "park" the printhead correctly and prevent drying.
- When a cartridge is truly empty, the printer will usually stop to prevent air from entering the printhead (which can burn it out).
- Replace cartridges promptly when empty.
By following these instructions, you should find ink cartridge replacement a manageable task. It’s all about being prepared, handling things gently, and letting the printer guide you through its prompts. With the new cartridges in place, your inkjet printer should be ready to produce vibrant prints again!
Discount Printer Ink
Check out the huge range of genuine & compatible ink cartridges at Good Egg at discount prices!
Top quality ink for HP, Brother, Canon, & Epson inkjet printers.
FAST FREE SHIPPING NZ-Wide for orders over $95
